

Hello! Shall we kick off the new blog with a pattern?
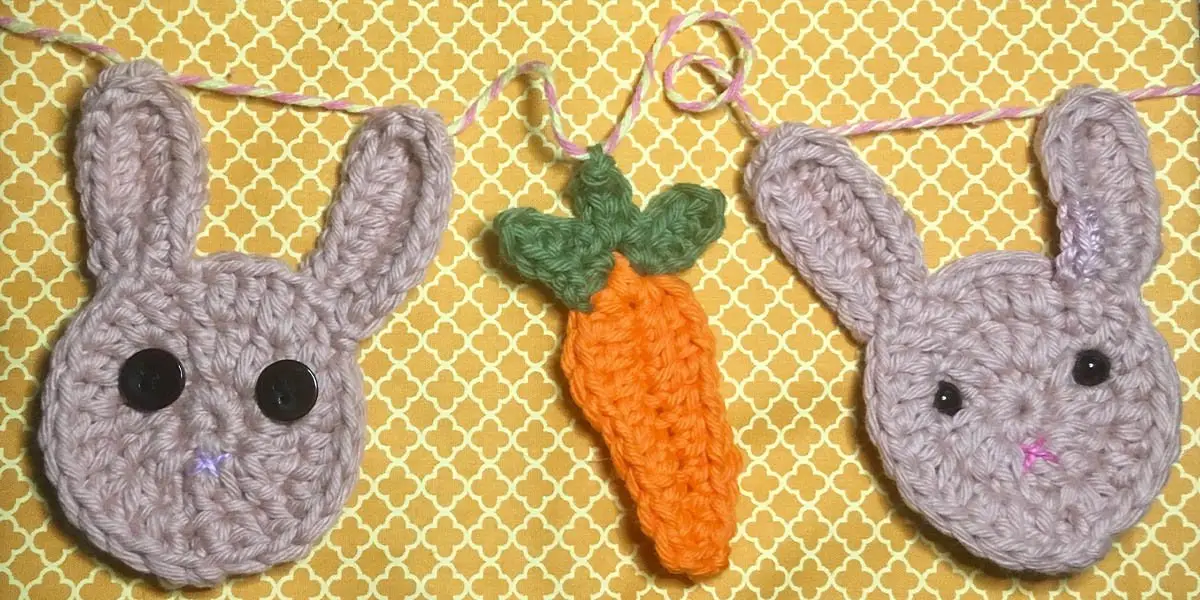
On March 24, 2017, I did a “live” (a live video) on Pannobom’s Facebook page, alongside Marcelo Dutra, and taught how to make a little Easter clothesline! If you missed it, here’s the link to the video: https://www.facebook.com/Pannobom/videos/1271809569541213/. Now, to make it easier and so everyone can make it, I’ll share the complete pattern with you!
The great thing is that this is a very versatile project… In addition to the little clothesline, you can make the pieces individually (the bunny and the carrot) to create patches to apply to other items, you can make a coaster with the bunny—in short, you can let your imagination run wild! So, let’s get started!
Materials Needed
: Barroco yarn by Círculo in the following colors: beige (I used color 6001), orange (I used color 4456), and green (I used color 5718).
3.5mm crochet hook.
2 small buttons or 1 pair of 8mm safety eyes to make the bunny’s eyes (I have safety eyes available if you need them; contact me via email to learn more: contato@amigurumix.com.br). You can also embroider the eyes with black thread or use two small felt circles.
Embroidery thread (I used Anne thread by Círculo) in pink.
Embroidery needle (with a large eye) and scissors.
Key
V: round or row sc: single
crochet sl st: slip
stitch hdc: half double
crochet dc: double
crochet inc: increase
At the end of each round, I’ll indicate the total number of stitches you should have in that round!
When a sequence is placed in parentheses followed by the “x” symbol, it indicates the number of times you should repeat that sequence. Example: (1 inc + 1 sc) x 6 = you should repeat the sequence of 1 increase and 1 single crochet 6 times.
Watch the video to understand better: https://www.facebook.com/Pannobom/videos/1271809569541213/!
Bunny
Head
Pattern V1: magic ring + 8 sc = 8 sc.
R2: 3 chain stitches + 2 double crochets in each of the 8 single crochets from R1 (increase) + 1 slip stitch to join the last double crochet to the first double crochet = 16 double crochets.
Row 3: 3 chain stitches + [(1 increase + 1 double crochet) x 8)] + 1 slip stitch to join the last double crochet to the first = 24 double crochets.
Fasten off and weave in the loose ends on the wrong side (using an embroidery needle).
EARS
Make 2.
Chain 8, skip the first chain, and work 2 sc + 4 hdc + 4 hdc into the last stitch. Go around to the other side of the chain stitches and work 4 half double crochets + 2 single crochets.
Fasten off, leaving a long tail for sewing to the head.
FINISHING
Sew the ears to the top of the head, leaving about 3 stitches between them.
Attach the eyes (I attached them at the height of St. 2) and embroider an “X” to make the nose with pink yarn (I embroidered it just below St. 1).
Carrot
Pattern CARROT
BODY Chain 11, skip the first chain, and begin:
Side 1 of the chains: 3 sc + 3 hdc + 3 dc + 3 hdc into the last stitch.
Side 2 of the chain stitches: 3 double crochets + 3 half double crochets + 3 single crochets + 1 slip stitch to join to the first single crochet on Side 1.
Fasten off and weave in the ends on the wrong side.
LEAVES
Attach the green yarn to the top of the carrot’s body.
First leaf: 4 chain stitches + 3 sc (skipping the first chain stitch) + 1 sc in the carrot’s body, at the same stitch where you started with the 4 chain stitches.
Second leaf: 4 chain stitches + 3 single crochets (skipping the first chain stitch) + 1 single crochet in the carrot’s body, in the stitch next to where you attached the first leaf.
Third leaf: 4 chain stitches + 3 single crochets (skipping the first chain stitch) + 1 single crochet on the carrot’s body, at the spot next to where you attached the second leaf.
Fasten off and weave in the ends on the wrong side.
Assembling the Clothesline
Make as many bunnies and carrots as you’d like to create your clothesline. Thread a string or twine of your preferred size and color through one stitch on each ear (at the tips) and through the second leaf (at the tip). Adjust the position of each bunny and carrot on the string.
Did you like it? Leave a like and your comments here on the post! Did you make your own? Show it to me on social media with #amigurumix—I want to see it! Follow the Blog (at the bottom, on the right-hand side) to get notified of all the new posts here! This is a space for us to share patterns and information! Welcome to this new channel—enjoy it to the fullest!